Price Testing
Jun 17, 2026
How Do I Run a Price Test on Shopify?
Pricing is one of the highest-leverage decisions in your store. Price testing is how you stop guessing and start making decisions backed by your own data.

Carlos Trujillo

Price testing means running your current price against one or two alternatives simultaneously with real visitors. Getting that running on Shopify is where Intelligems comes in. Once implemented, it splits traffic between variants automatically, no custom code or duplicate listings required. Here's how to configure your first test, what to measure while it runs, and how to read the results when it's done.
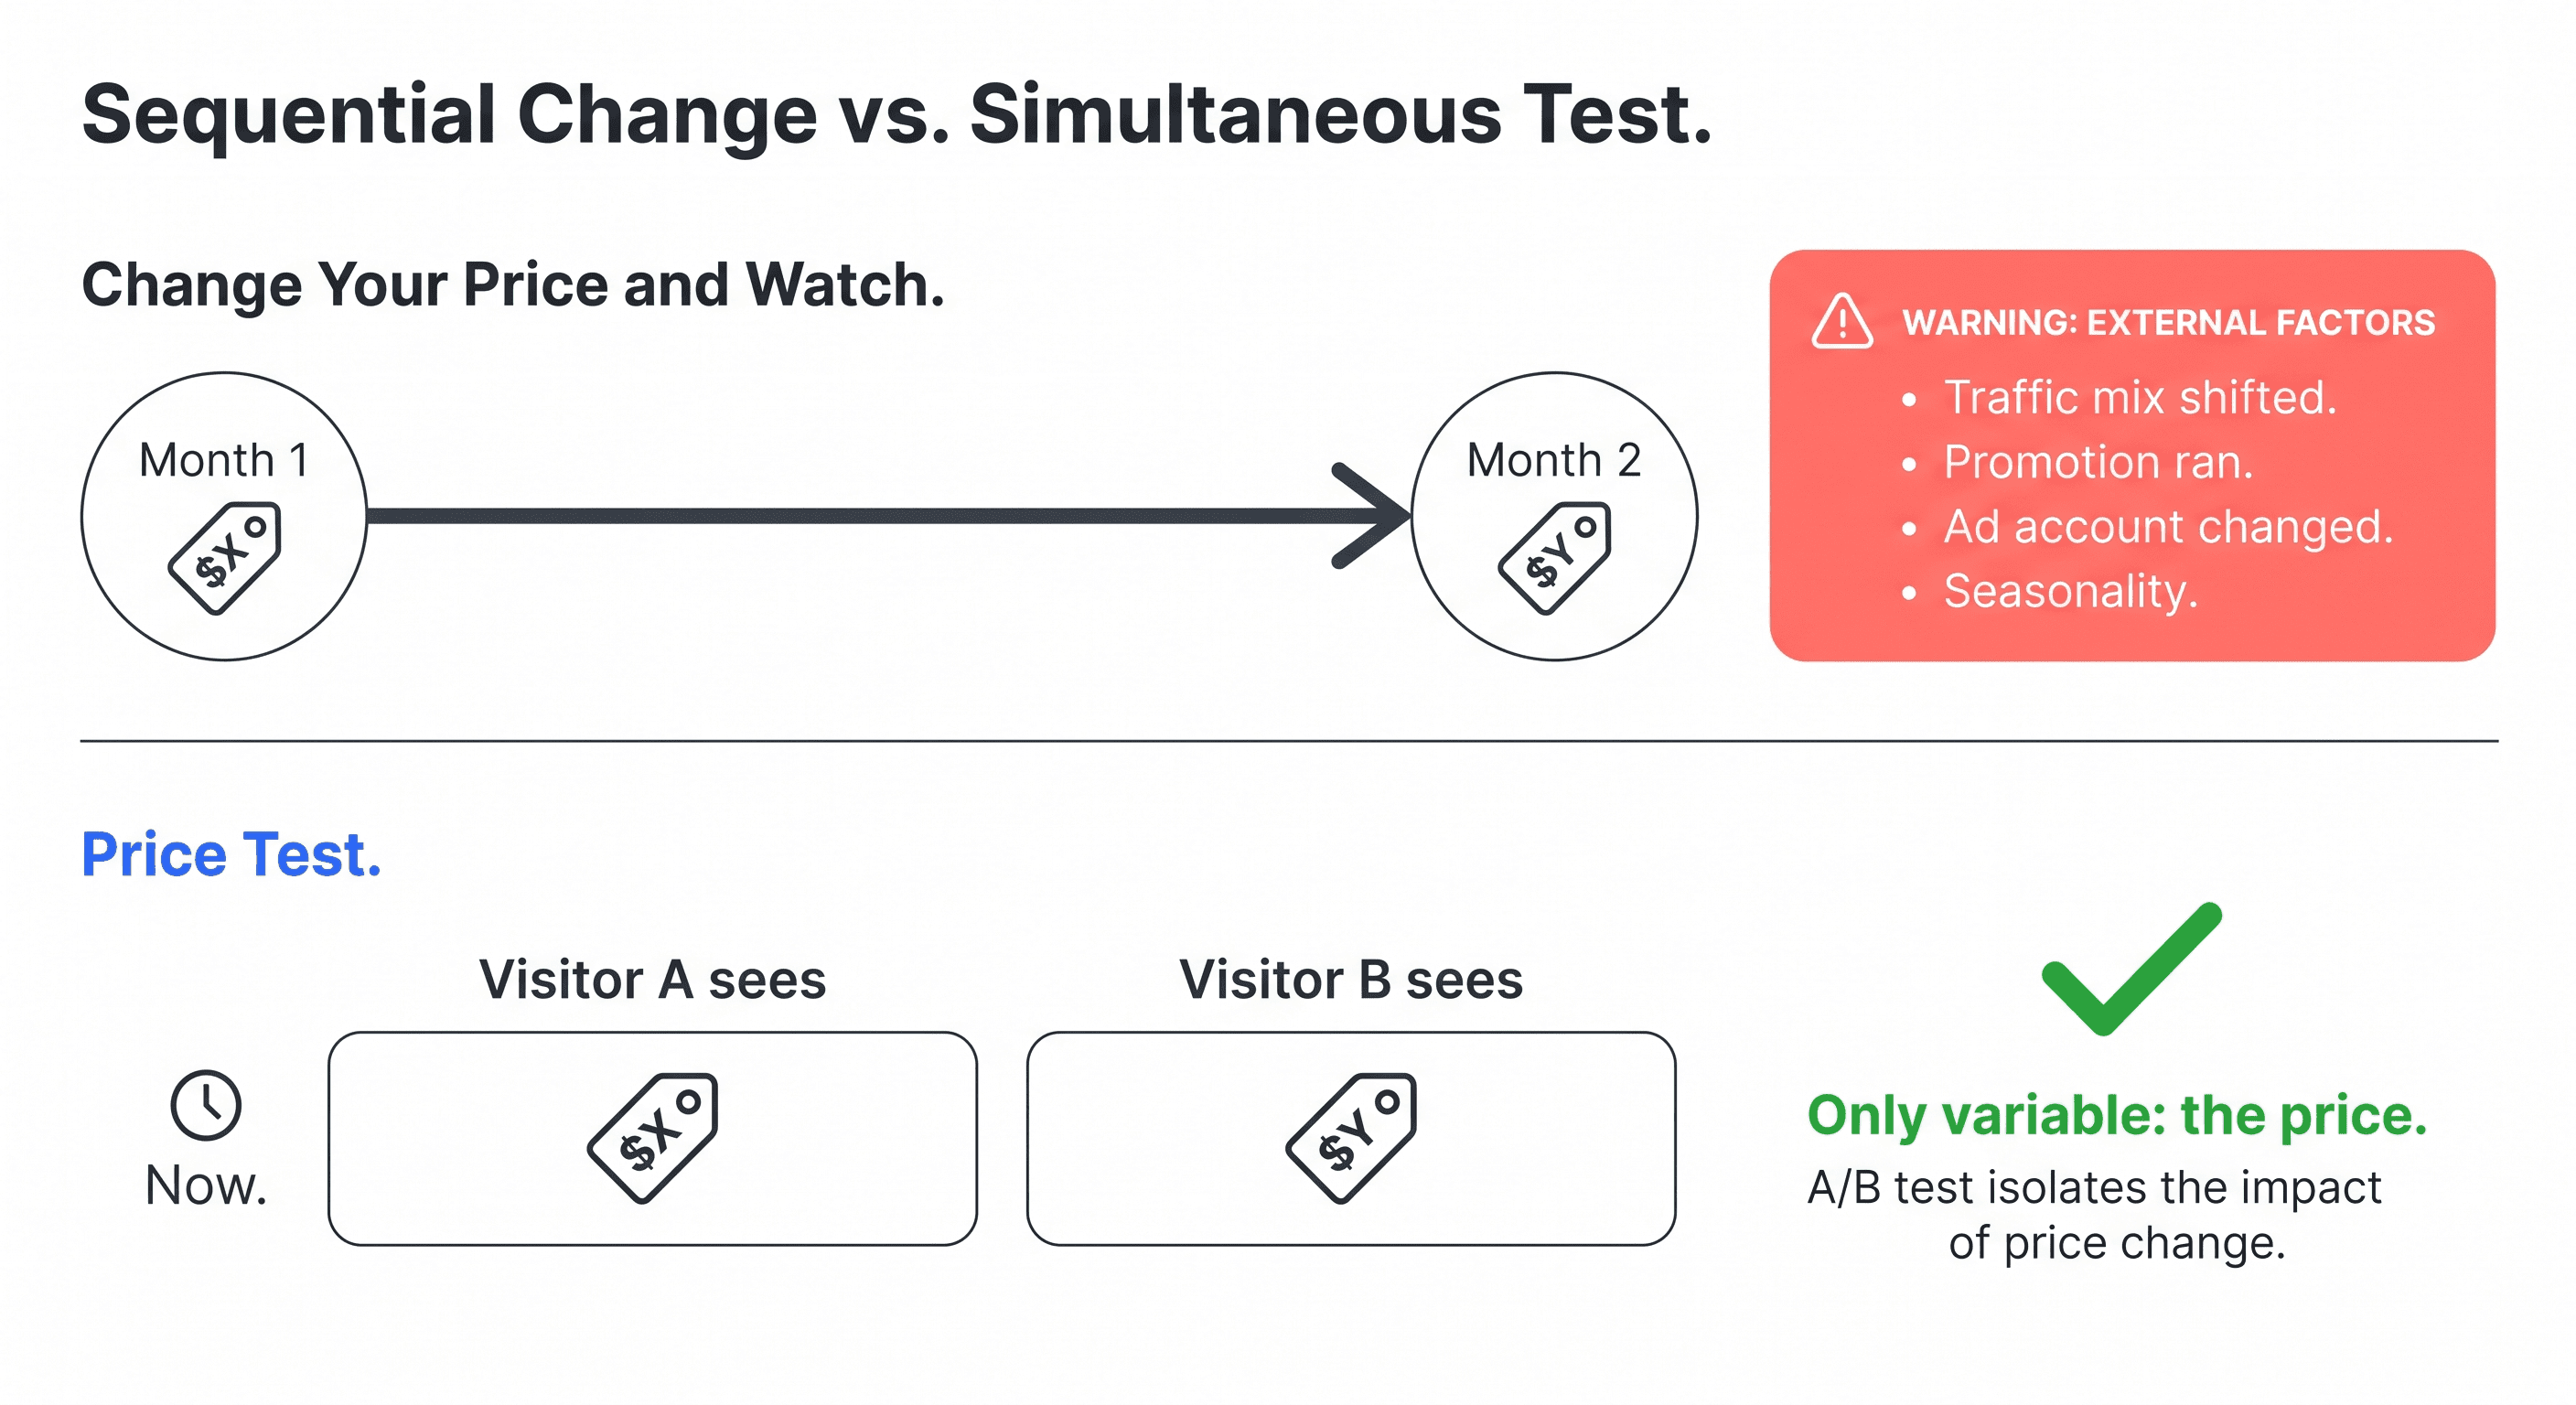
Changing Your Price Isn't the Same as Testing It
Pricing is one of the highest-leverage decisions in your store, and one of the hardest to get right by gut feel alone. The shortcut most brands try: raise or lower the price, wait a month, compare the numbers. The problem is a month of post-change data is measuring a lot of things at once. Traffic mix shifts. Seasonality creeps in. A promotion runs. Something in the ad account changes.
Price testing solves that by running variants simultaneously. Different visitors see different prices at the same moment, so the only thing that changed between them is the number they saw. After two or three weeks, you look at which variant drove more revenue per visitor and roll it out. No guessing, no before-and-after noise.
It's also why benchmarking against competitors or going off gut feel can only take you so far. Your customers, your margins, and your traffic mix are specific to you. Testing gives you data about your situation.
Enter Intelligems
Shopify doesn't have a built-in solution to show different prices simultaneously. Without a dedicated tool, you're looking at workarounds like duplicate listings, manual traffic splits, and stitching together your own reporting.
Intelligems is built specifically for this. It assigns each visitor to a variant automatically, keeps that price consistent across every visit and at checkout, and surfaces results in terms of profit per visitor rather than raw conversion rate. No duplicate listings, no theme edits, no manual routing. It's the most purpose-built solution for price testing on Shopify, and the one with the most merchant data behind it.
The steps below walk through how to configure your first test.
Setting Up Your First Price Test
Step 1: Pick One Product to Start
Don't start by testing your entire catalog. Pick one product and learn from it first. If you're wondering whether you can test prices on all products at once, the short answer is yes, but it's not where most brands should start.
Your best-seller is typically the right choice. It has enough traffic to generate data quickly, and you know its margins well enough to understand what a price change actually means for profit. If your best-seller is a gateway product, you might want something with a bit more margin flexibility, but start focused either way.
One product at a time gives you clean signal. Running several tests at once makes it harder to know what you're actually learning.
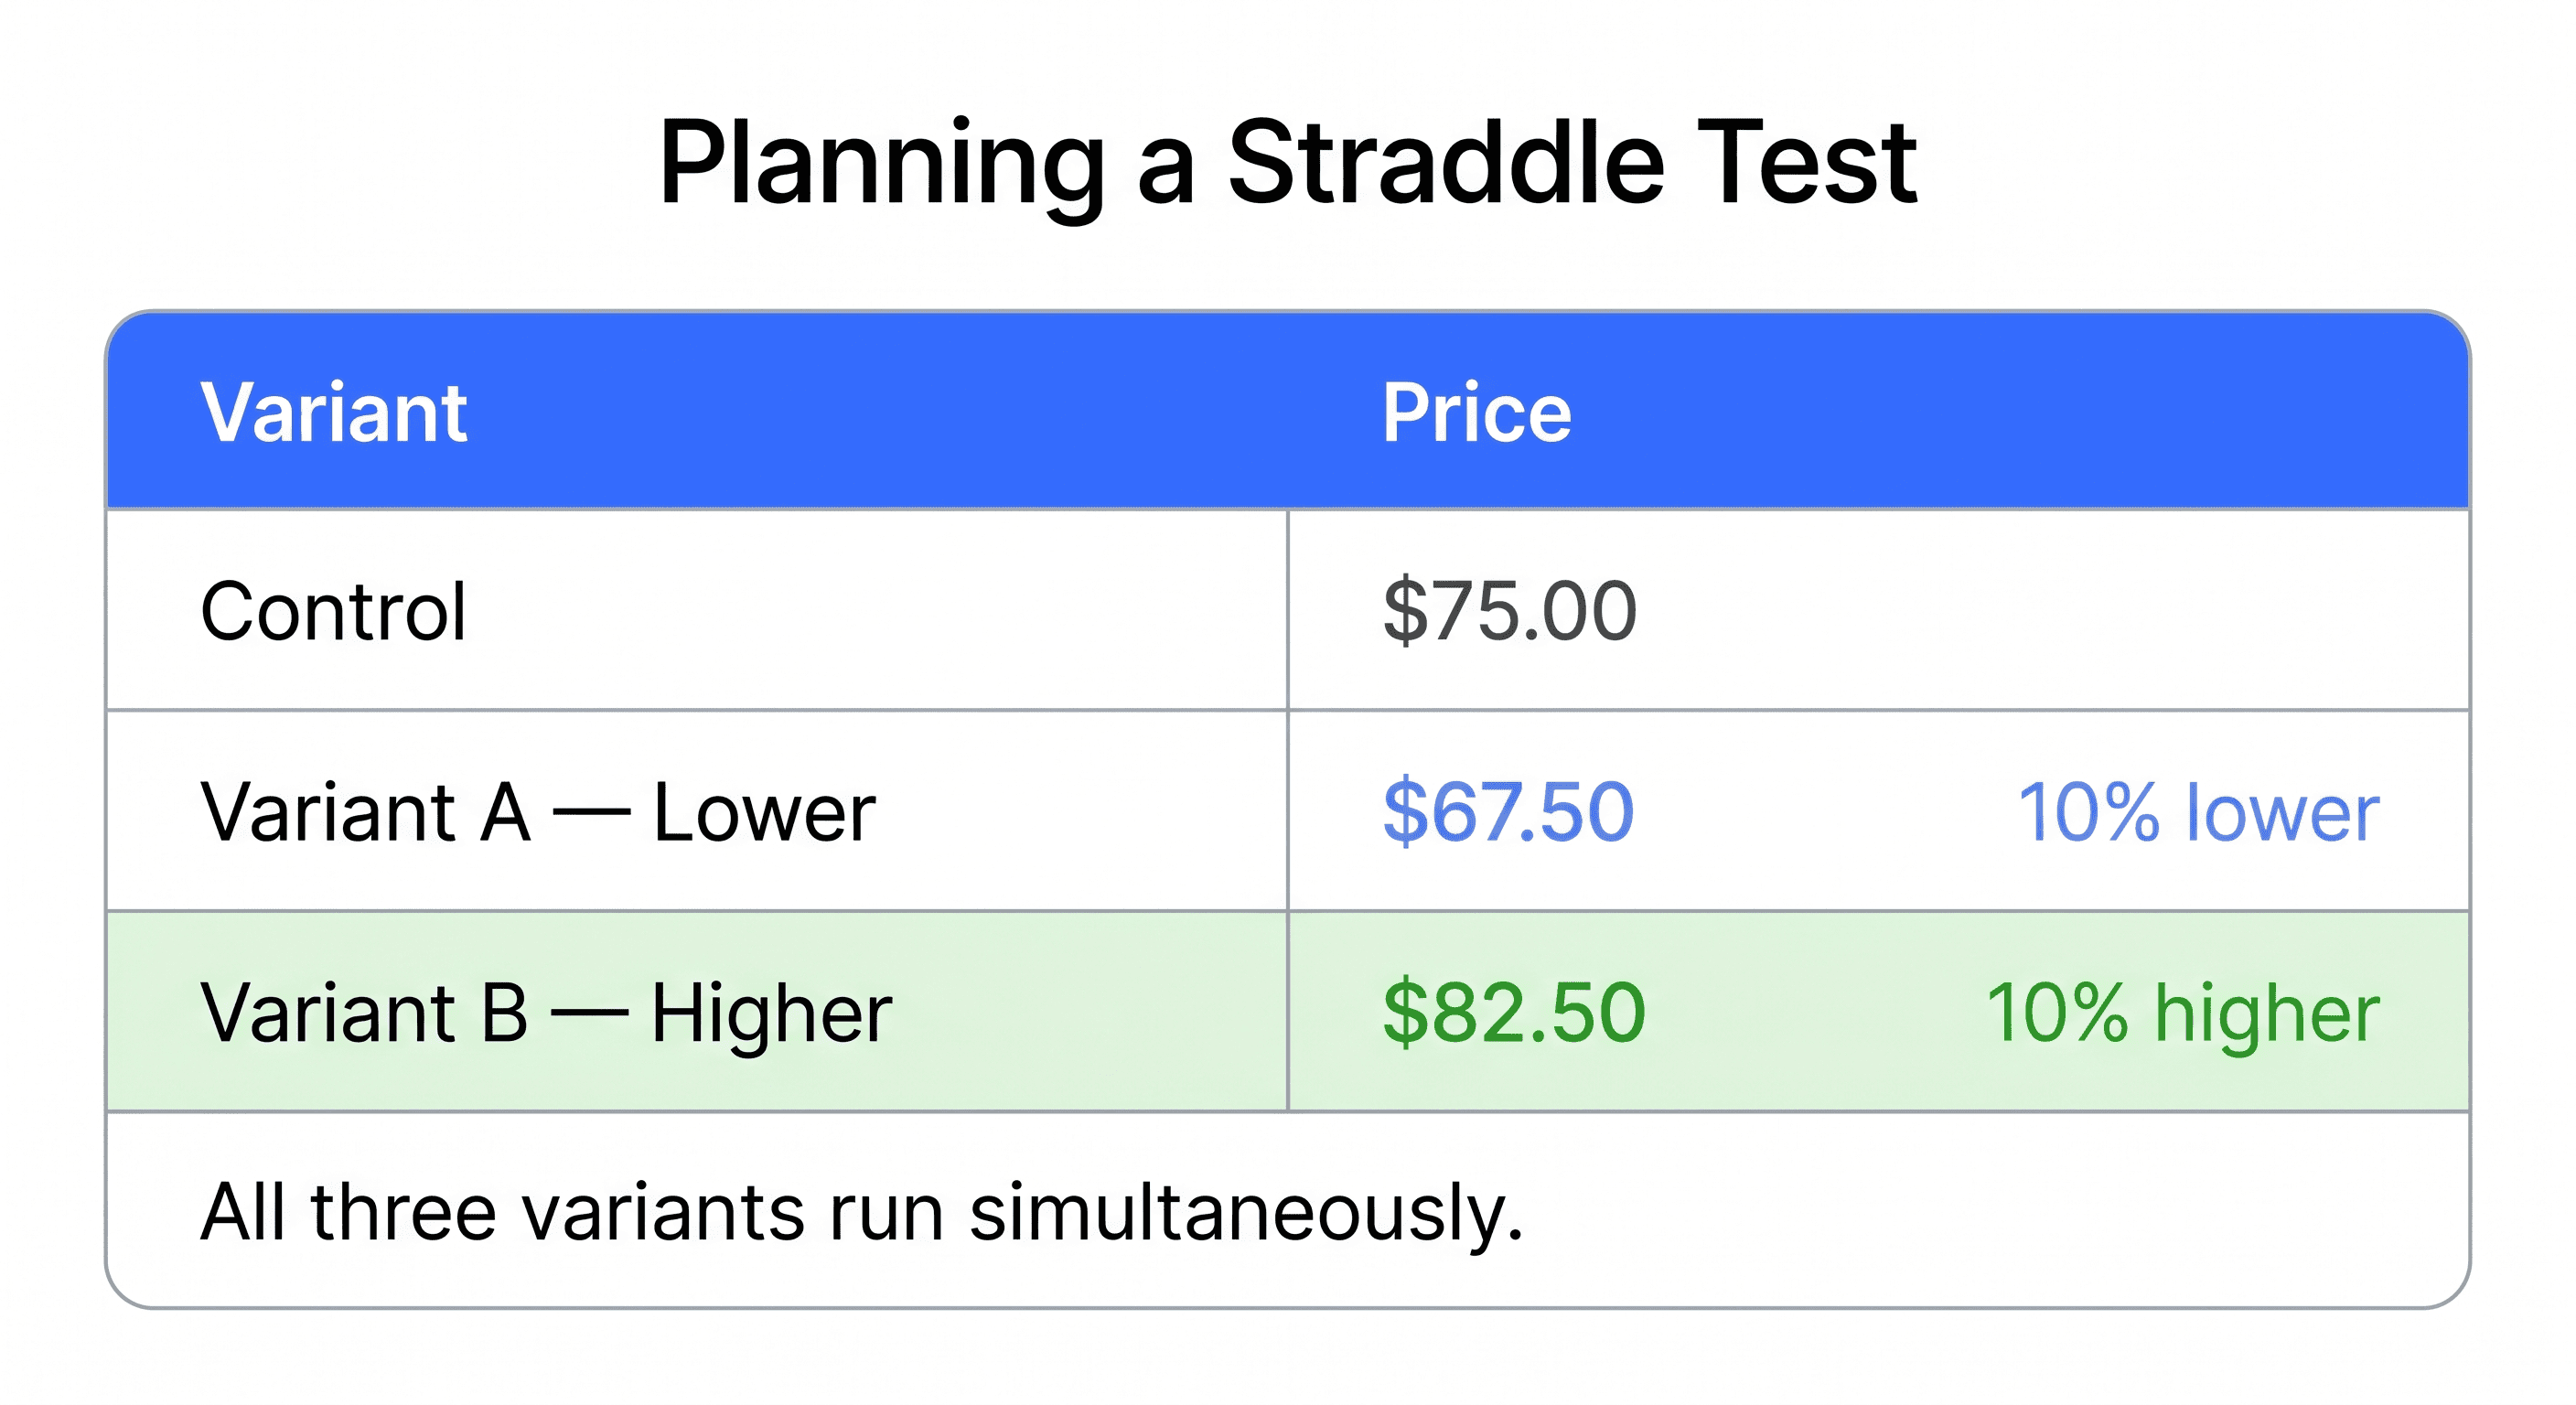
Step 2: Plan Your Straddle Test
A straddle test runs three variants simultaneously: your current price as the control, a slightly higher price, and a slightly lower price. If you already have a directional hypothesis (say, you think you're underpriced), two variants work fine. If you're starting from scratch, a straddle gives you signal in both directions at once.
If you're currently at $75, a typical straddle looks like this:
Control: $75 (current price)
Variant A: $65–70 (5–10% lower)
Variant B: $82–85 (5–10% higher)
The 5–10% range is wide enough to surface a real signal and narrow enough to reflect realistic pricing decisions. Going smaller than 5% often produces results too close to call. Going wider than 15% starts testing scenarios that aren't really on the table.
Based on data from thousands of price tests, a 5% price change typically moves conversion rate by around 10% in the opposite direction. That ratio helps you think through the trade-off before you run anything.
Step 3: Install Intelligems and Configure Your Test
First, install Intelligems from the Shopify App Store. Once set up, incoming visitors are automatically assigned to a variant. They see the corresponding price across every visit, including at checkout. No duplicate listings, no manual price changes, no theme editing required. Full setup walkthrough in the Intelligems docs.
Step 4: Measure Revenue Per Visitor, Not Just Conversion Rate
The metric you'll be tempted to watch is conversion rate. It moves fast and it's easy to read.
But conversion rate alone can mislead you on a price test. A lower price will often convert better. That doesn't mean it generated more revenue or more profit.
Start with revenue per visitor: what your store earns per visitor during the test window, accounting for both conversion rate and order value together. That already tells you more than conversion rate alone.
From there, profit per visitor goes a step further: revenue per visitor minus your COGS (cost of goods sold). That's the number that tells you whether a variant that converts better actually made you more money after accounting for what it cost to fulfill. Intelligems calculates this once your costs are mapped.
IntelliJAMS EP 028 covers the fundamentals of price testing, including how to read your results and avoid the most common setup mistakes.
Step 5: Give It Enough Time
Run the test for at least two weeks, ideally closer to three. For a deeper look at test duration and when it's actually safe to call a winner, see How Long Should I Run My A/B Test?
Shopper behavior shifts across the week. Weekday and weekend traffic often behaves differently. Payday timing can affect purchase decisions for some products and audiences. If you stop after five days because one variant is trending, you might be reacting to noise rather than a real pattern.
When the numbers hold steady across several days and traffic is distributed evenly across variants, that's when you can start trusting what you're seeing.
Reading the Results
When you end the test, you'll typically see one of three things:
The higher price wins. Your market has more willingness to pay than your current price captures. You can raise the price and improve profit without meaningful volume loss. If you're on the fence, Will Raising Prices Hurt My Sales? is worth a read before you roll it out.
The lower price wins. The conversion lift more than offsets the margin reduction. Worth rolling out, but also worth asking whether an even smaller discount would have gotten most of the way there.
Results are flat across variants. This often means your current price is in a range where customers aren't especially sensitive. A flat result on the higher-price variant can be permission to raise it without much risk.
None of these is a failure. Even a flat or inconclusive test tells you something useful about how your customers respond to price changes.
Common Mistakes to Avoid
Stopping too early. A leading variant after a few days isn't necessarily the winner. Let the pattern stabilize before calling it.
Testing during a promotion. Sale traffic behaves differently from regular traffic. A price test run alongside a sitewide discount will produce data that doesn't apply to normal conditions.
Running ads that mention a specific price. If an Instagram or Meta ad shows "$75" and a visitor lands on a variant priced at $82, you've broken the test and the experience. During a price test, keep your ads price-agnostic. Lead with the product, not the number.
Starting with too many products. The first test is about learning how your customers respond to price changes. Not optimizing everything at once. Start narrow.
What Comes Next
Once you have a result, you can roll out the winning price. Not sure what to do from there? What Should I Do After Finding a Winner? covers the follow-on moves and start thinking about what to test next. Common follow-ons include narrowing the winning range (if $82 won, does $87 do the same?), testing a different product, or exploring how different customer segments respond to the same price.
Each test builds on the last. That compounding is where price testing gets interesting.
AB Testing
Ecommerce Strategy
Expert Guide

