


Checkout Testing
Oct 29, 2025
Checkout Experiences - Where Should I Start?
Most merchants face the same question when setting up their first block at checkout: What should I add first?

Most merchants face the same question when setting up their first block at checkout: What should I add first?
Some start with trust badges—free shipping, returns, warranties. Others lead with social proof. A few begin with shipping cutoff messages. Each approach can work, depending on what your customers need to hear.
The challenge isn't finding the "perfect" first block. It's getting something live quickly, seeing how customers respond, then iterating from there. For most stores, trust signals tend to be the safest starting point. But the only way to know what works for YOUR customers is to test.
Let's explore which blocks tend to work well as starting points—and why context matters more than following a formula.
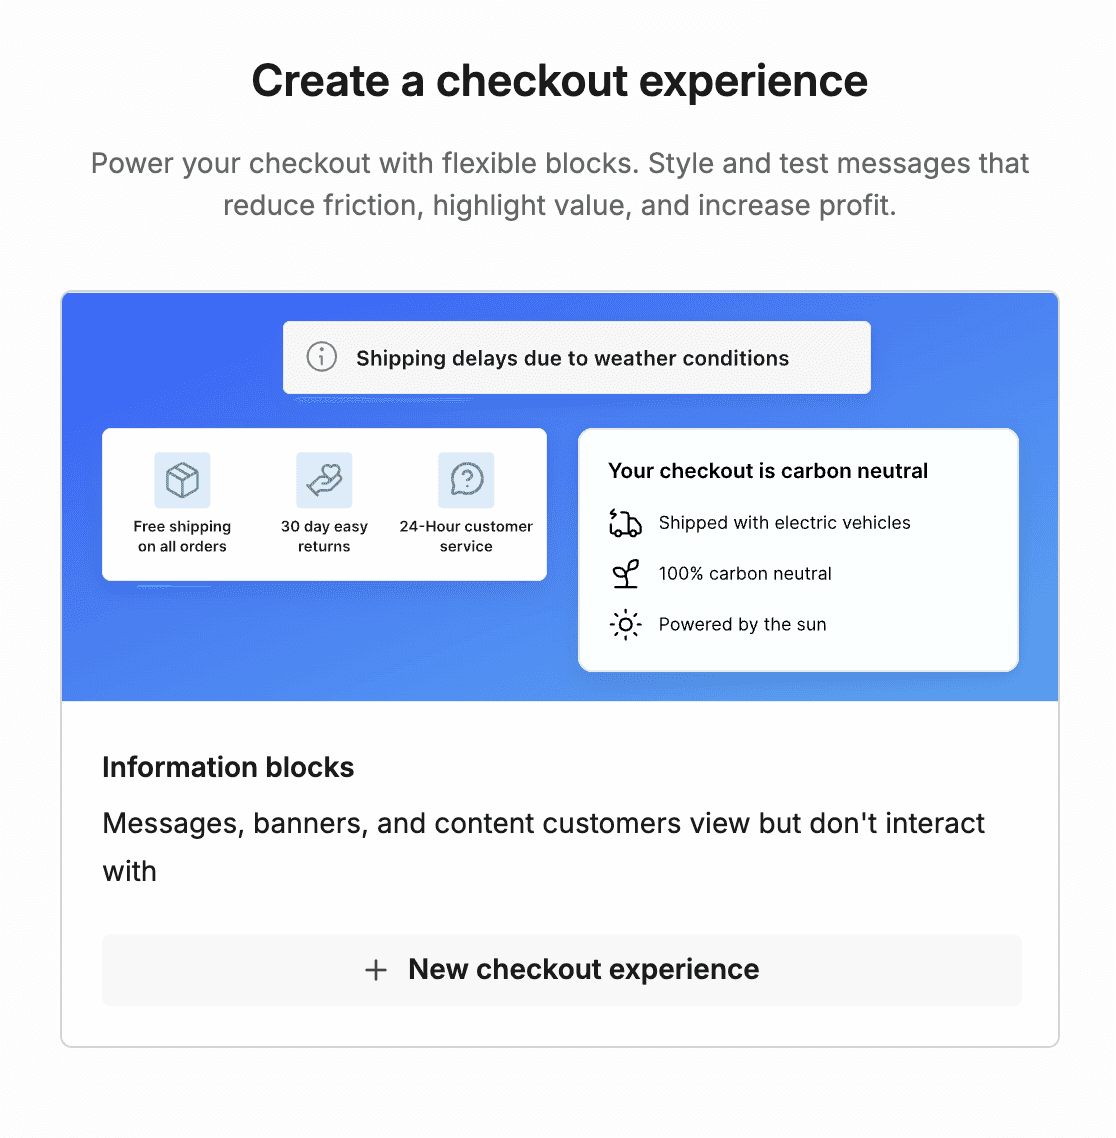
What Are Checkout Experiences?
Custom content at checkout that builds confidence at the moment of purchase
Checkout Experiences let you add content blocks directly to your Shopify checkout page. These blocks appear at the final step of the purchase journey, where confidence and clarity matter most.
ℹ️ Checkout Experiences are only available for Shopify Plus plans

Think of these blocks as your last chance to address unspoken objections. A customer is seconds away from completing their purchase. They're wondering: Is this site secure? What if I need to return this? When will it ship? Will it actually arrive?
A well-placed block answers these questions before they become reasons to abandon. Every great block comes down to three elements: Where it appears, Who sees it, and What it says. Get those three right, and you've built something that reduces friction and improves conversion.
Which Blocks Should I Build First?
Start with trust signals, not sales tactics
Most brands try everything at once. They add five different blocks in the first hour, clutter their checkout with messages, and can't tell what's actually working. Or they copy what big brands show at checkout, optimizing for someone else's customers instead of their own.
One effective approach: Consider starting with trust. Not urgency. Not upsells. Not another sales pitch. Just simple, clear reassurance that addresses common purchase hesitations across most product categories.
Here are four blocks that tend to work well as starting points across most stores:
Trust Badge Set: Display your core promises in one block. Free shipping, free returns, lifetime warranty. These answer the three questions every customer has: How much will this cost me total? What if it doesn't work out? How long will it last?
Security Callout: Show payment icons and security badges. Visa, Mastercard, SSL encryption, Shop Pay. Customers need to know their payment information is safe. Make it obvious.
Social Proof Header: "Trusted by 100,000+ customers" or "4.8 stars from 10,000+ reviews." This builds credibility through numbers. New customers especially need this reassurance.
Shipping Cutoff Message: "Order by 2PM, ships today" or "Free 2-day shipping on all orders." Removes uncertainty about when they'll actually receive their purchase. Especially important for time-sensitive purchases.
These four blocks work because they answer unspoken objections. They don't try to sell more. They just remove friction and build confidence at the moment it matters most.
Watch these quick setup guides:
Need more ideas? Browse the Checkout Experiences Library for additional block examples and inspiration.
Why Checkout Content Matters
A few well-placed words can be the difference between abandoned cart and completed sale
Checkout is the most valuable real estate on your entire site. A customer has already decided they want your product. They've added it to cart. They've started entering their information. They're seconds away from completing the purchase.
This is where small improvements create massive returns. A 2% increase in checkout conversion on $1 million in revenue means $20,000+ in additional profit annually. And unlike product page optimization or cart improvements, checkout changes affect every single customer who makes it this far.
Your North Star metric here is profit per visitor. Not just conversion rate. Not just average order value. Profit per visitor captures the full picture:
Profit per visitor = (Revenue - Costs) ÷ Total visitors
A block that increases conversion by 2% while maintaining your average order value and margins directly increases profit per visitor by 2%. That improvement compounds across every visitor who reaches checkout, every day, for as long as that block remains active.
The message you show at checkout can either build confidence that pushes customers over the finish line, or raise new questions that send them away. Most brands never test to find out which is happening.
What's the Simplest Setup I Can Do?
Build your first trust badge block in under 15 minutes
You don't need to design the perfect block. You need to get something live, see how it performs, and iterate from there. Here's the fastest path to your first checkout experience.
Step 1: Choose Your First Block
Start with a trust badge block. Pick three promises that matter to your customers: free shipping, easy returns, and your core product guarantee. These address the most common purchase hesitations across nearly every product category.
Don't overthink the specific wording yet. "Free Shipping," "30-Day Returns," and "Lifetime Warranty" work perfectly. You can test different messaging later once you have data.
Step 2: Configure in Intelligems
In your Intelligems dashboard, create a new Checkout Experience. Choose the trust badge layout. Add your three badges with simple icons and clear text. Pick colors that match your brand but prioritize readability over aesthetics.
Give your block a clear internal name like "Trust Badges - Main" and create a Location ID like "trust-badges-main." You'll need this Location ID in the next step.
Step 3: Copy Your Location ID
The Location ID is the unique identifier that connects your Intelligems block to your Shopify checkout. Copy it exactly as shown. This is what tells Shopify which content to display.
Step 4: Add to Shopify Checkout Editor
In your Shopify admin, go to your theme's Checkout customization. Click "Add block" and select "Intelligems A/B Testing" from the app blocks. Paste your Location ID into the block settings.
Position the block above your order summary. This placement catches attention without interrupting the checkout flow. You can drag the block to reorder it if needed.
Step 5: Activate and Watch
Return to Intelligems and activate your Checkout Experience. Your block will now appear for customers at checkout. Monitor your checkout conversion rate for 2-3 weeks to establish a baseline.
Once you have baseline data, you can create variations and test which trust signals resonate most with your customers. But first, just get something live.
Common Mistakes That Waste Time
Don't clutter, don't oversell, don't skip mobile preview
Adding too many blocks at once. Five different messages competing for attention creates noise, not trust. Start with 1-2 blocks. Add more only after you understand what's working.
Making it about sales, not trust. Checkout is the wrong place for "Limited time offer!" or "Buy more and save!" Customers are already buying. They need reassurance, not another pitch.
Same blocks for everyone. New customers need more trust signals than returning customers. Someone in France cares about different guarantees than someone in the US. Use targeting to show relevant messages.
Ignoring placement. Above the order summary builds trust early. Below the order total reinforces confidence right before payment. The position changes the impact. If you're on a Plus or Blue plan, test placement to find what works best for your checkout.
Forgetting mobile view. More than 70% of checkout happens on mobile devices. Preview your blocks on mobile before activating. What looks clean on desktop can feel cluttered on a phone screen.
Not planning to test next. Getting your first block live is step one. Testing which content converts best is step two. If you're on a Plus or Blue plan, testing different messages reveals what actually builds trust with your specific customers.
Stop Overthinking. Start Building.
Most brands overthink their first block at checkout. They try to build the perfect message, test every possible variation, and wait until everything is ideal before launching anything. Meanwhile, their checkout stays the same and customers keep abandoning.
The truth is simpler. Start with basic trust signals. Free shipping, easy returns, secure checkout. Get them live at checkout. Monitor the impact for a few weeks. Then test variations to find what converts best.
Your path forward:
Build one trust badge block with your core promises (shipping, returns, guarantee)
Add it above your order summary in Shopify checkout
Keep the message simple and reassuring, not sales-focused
Monitor checkout conversion rate for 2-3 weeks to establish baseline
Then test different content to optimize (requires Plus or Blue plan)
Don't guess which blocks to start with. Start with trust!
Ready to reduce checkout abandonment and build customer confidence? When you're ready to optimize checkout beyond the basics, let's get you testing beyond what's typical.
AB Testing
AB Testing
AB Testing

